GolfBuddy Knowledgebase
-
How To Device RESET
If you experience incorrectly yardages or unusual behavior on the WT6, we recommend doing a RESET. This procedure will set the WT6 back to factory settings and should solve software related problems. To reset the WT6, press and hold the GOLF, MENU, UP and DOWN
URL : http://help.golfbuddy.com/sList.asp?searchproduct=25&searchcategory=3&seq=1612&page=1&searchtext= -
How To Set Time
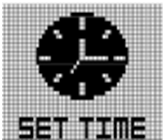
The WT6 time will set automatically once the watch successfully connects to satellites. First, user needs to set the Time Zone, 12/24 Hours Format, Day Format, and DST.
In Main Menu mode, press “UP” and “DOWN” buttons to select "SET TIME" function. Press “OK” button to activate this function.
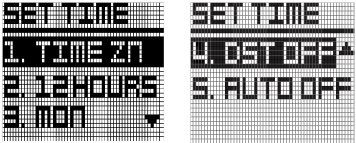
In Set Time mode, you have option for "1. TIME ZN", "2. 12HOURS", "3. MON", "4. DST OFF" and "5. AUTO ON/OFF" setting. Press “UP” and “DOWN” buttons to select the function and press button “OK” to confirm the selection.
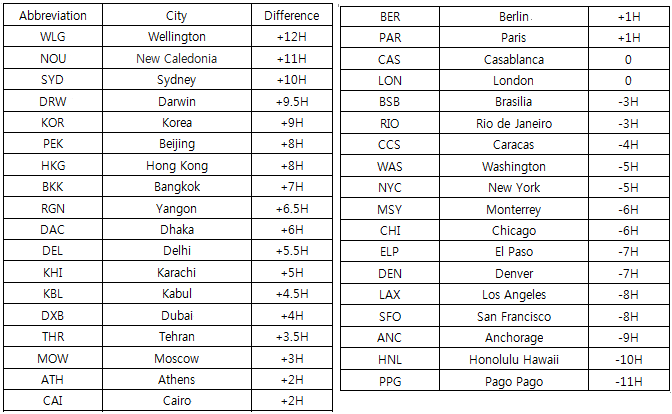
Time zone

User can change time zone to suit location. Select “TIME ZN”, the screen will change to screen shown in right image. Press “UP” and “Down” to change time zone Time Zone default setting is "LON 0H".
12/24 Hour Format
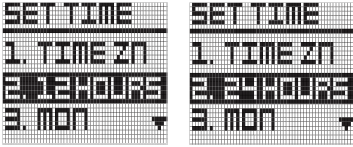
To change, move to menu using navigate button. Press the “OK” button, use “UP” and “DOWN” buttons to select. The default is "12HOURS" and the other option is "24HOURS".
Day Format
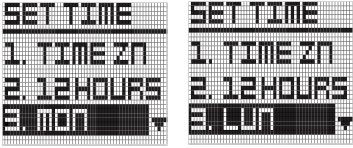
To change, move to menu using navigate button. Press the “OK” button, use “UP” and “DOWN” buttons to select.
The default Day Format is "MON" and the other option is "LUN".
• MON : English notation of day
• LUN : French notation of day
DST
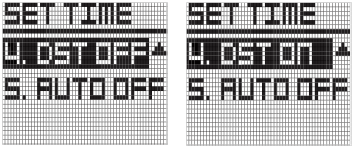
DST is the Daylight Savings function To change, move to menu using navigate button. Press the “OK” button, use “UP” and “DOWN” buttons to select.
The default is "DST OFF” and the other option is "DST ON".
AUTO ON/OFF
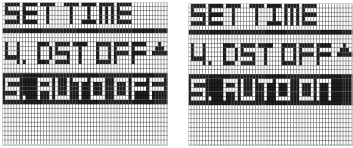
This feature allows users that prefer to sync their time. In most cases, this is unnecessary. Minutes are set via GPS only. Press the “OK” button, use “UP” and “DOWN” buttons to select.
URL : http://help.golfbuddy.com/sList.asp?searchproduct=25&searchcategory=3&seq=1602&page=1&searchtext= -
How To GOLF MODE
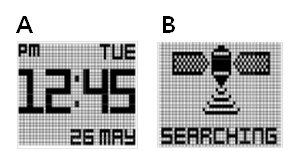
To enter Golf Mode, simply press the GOLF button from time mode. (Image A)
The screen shown in Image B will display.
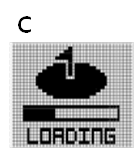
After selecting Golf Mode, the WT6 will search for satellite signal as shown in the image to the right (image B). This can be cancelled by pressing the “MENU” button once, and you will return to time mode. Once a satellite connection is established, the WT6 will load the golf course (image C). This will take approximately 25 ? 30 seconds. The loading screen also shows the golf unit of measurement setting for confirmation.
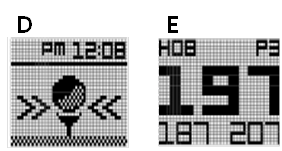
If you are not at a tee box after the golf course has finished loading, the WT6 will prompt you to head to the tee box (image D). Once you arrive at your starting tee box, the front, center, and back of the green distances (FCB) screen will appear (image E.).
Note : To access Play Golf mode properly, you should be at the golf course. If you are not at the golf course, the loading courses screen will display "Go to Course". This will also display in the rare occasion that you are at a golf course that is not currently mapped. If your course is not mapped, please contact the Golf Buddy Course Department: http://golfbuddyglobal.com/courselibrary
URL : http://help.golfbuddy.com/sList.asp?searchproduct=25&searchcategory=3&seq=1606&page=1&searchtext= -
How to Settings

In Main Menu mode, press “UP” and “DOWN” buttons to select "SETTING" function. Press “OK” button to activate this function. There will be 3 items: Unit scale, Sound, Slope.
UNIT
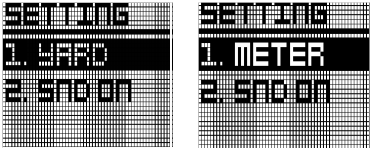
To set unit of measurement (affecting Golf Mode and Tracker) “YARD” or “METER, press the “OK” button. Then either can be selected.
SOUND
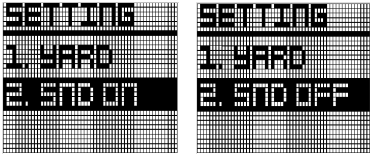
In order to turn the beep sound on or off, move to menu using navigate button. Press the “OK” button, and either can be selected.
URL : http://help.golfbuddy.com/sList.asp?searchproduct=25&searchcategory=3&seq=1601&page=1&searchtext= -
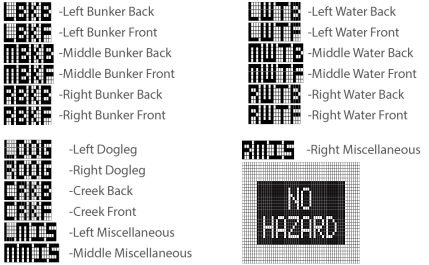
How To Hazards
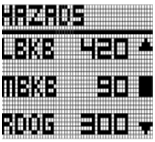
To view the available hazards for your current hole, press the OK button from the FCB screen.
The WT6 watch displays up to 11 hazards per hole.
Cycle through hazards using the UP button for next Hazard and the DOWN button for previous hazard.
Distance to the start point of hazards display at the bottom of the screen, while distance to the end point of hazards (if available) display at the top of the screen (Note: only 1 distance provided at a time)
Below are abbreviation information of Hazards
Pressing the OK button from the Hazards screen will show Green information (Information screen) and remaining battery life. User can change green information, using the UP and DOWN buttons.
URL : http://help.golfbuddy.com/sList.asp?searchproduct=25&searchcategory=3&seq=1608&page=1&searchtext= -
How To Power OFF

In Main Menu mode, press “UP” and “DOWN” buttons to select "POWER OFF" function. Press “OK” button to activate this function.
Press “UP” or “DOWN” buttons to select "YES" or "NO. Press “OK” button to confirm your selection.
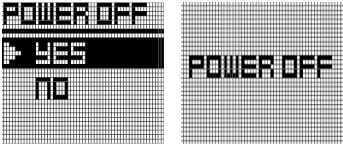
If yes is selected and confirmed by “OK” button, the message "POWER OFF" will display for 5 seconds and the screen will be turn off.
Press and hold “MENU” button for 2 sec in OFF mode to activate the watch again.
URL : http://help.golfbuddy.com/sList.asp?searchproduct=25&searchcategory=3&seq=1605&page=1&searchtext= -
How To Information
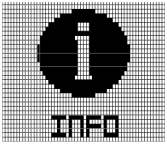
Find information on remaining battery, application, firmware version and serial number.
In Main Menu mode, press “UP” and “DOWN” buttons to select "INFO" function. Press “OK” button to activate this function.
Information of battery level, firmware version, and serial no. will be displayed by using “UP” or “DOWN” buttons.
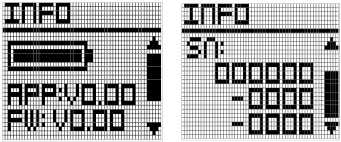
• APP : Golf application version
• FW : Device firmware version
• SN : Device serial number
URL : http://help.golfbuddy.com/sList.asp?searchproduct=25&searchcategory=3&seq=1604&page=1&searchtext= -
How To Mark Function (Shot Distance)
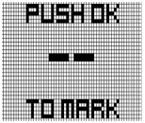
Mark Function is Shot Distance Measurement feature.
To measure the distance of any shot, press the GOLF button during Golf play mode. Screen will show image on the right.
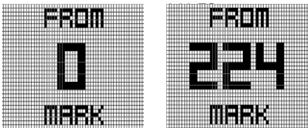
When standing at the location where the shot is taken, press OK button to activate Mark Function, then screen will change to image on right.
so will set the shot location (point A) to zero, and the device will begin measuring distance as you move toward your ball. Once you have made it to your ball (point B), the number displayed is the distance between point A and point B in a straight line.
To re-measure the Shot Distance press the OK button and the screen will show “0” as shown in above screen.
Pressing MENU, UP, or DOWN button when on the Shot Distance screen will return to the FCB screen. Active shot measurements will continue in the background, and can be viewed by cycling back to the Shot Distance screen.
Note : Shot data will reset when a hole advancement occurs (automatic hole advance or manual hole advance).
URL : http://help.golfbuddy.com/sList.asp?searchproduct=25&searchcategory=3&seq=1609&page=1&searchtext= -
How To Exit Golf Play
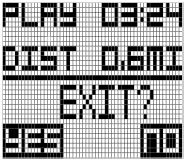
To Exit Golf play, press and hold the MENU button for 3 seconds, the WT6 will display a prompt to confirm your selection.
If you want to end golf play, press the MENU button to confirm your selection.
You will then see the End of Golf play Summary.
Alternately, if you want to keep playing golf, press the DOWN button to return to Golf Mode.
URL : http://help.golfbuddy.com/sList.asp?searchproduct=25&searchcategory=3&seq=1611&page=1&searchtext= -
How To Tracker
In Main Menu mode, press UP” and “DOWN” buttons to select "TRACKER" function. Press “OK” button to activate this function.
The watch will start to search for the GPS signal. The message "SEARCHING" will be displayed. Press “MENU” button to disable Tracker mode and return to Time mode.
When the watch locks with the GPS signal, the display will show Distance in the middle row and Exercise Time in the lower row. Exercise time counting will start automatically.
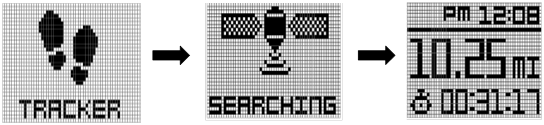
Press “DOWN” button to pause the Exercise Time and press “DOWN” button again to restart counting.
Press “UP” button to reset the Tracker and press “MENU” button to return back to Time mode.
URL : http://help.golfbuddy.com/sList.asp?searchproduct=25&searchcategory=3&seq=1603&page=1&searchtext=